The title of this content on the left side of a graphic depicting two nonprofit employees managing their store’s inventory.

4 Tips for Managing Your Nonprofit Store’s Inventory

Although stores are generally associated with businesses and corporations rather than nonprofits, various mission-driven organizations run stores to generate sustainable funding. Just think of the gift shops in art museums or bookstores run by schools or colleges.

However, running a nonprofit store presents unique obstacles that your organization may not have experience handling. Key among them is inventory management. Much like with product fundraisers, it’s crucial to keep the items you’re selling well-stocked to meet customer demands.

If you’re feeling out of your depth, don’t worry — this guide will cover four tips for managing your store’s inventory. Let’s get started!

1. Set up an inventory organization system.

When you’re first starting your store, most or all of your inventory may be on the floor. In that case, it’s less about storage and more about creating visually appealing displays that draw customers in and entice them to make a purchase. Once your store grows and begins to store more inventory, that’s when it becomes complex.

Effective inventory management begins with an organized storage system. Start by purchasing physical storage solutions for your backrooms, including:

  • Shelving units
  • Storage cabinets
  • Storage bins
  • Wire shelving

Additionally, purchase a label maker and label your storage systems accordingly. This will help you locate items in the future, making restocking more efficient. Since you’ll be selling and acquiring inventory constantly, don’t be afraid to invest time into organizing your storage well. This is especially important for nonprofits that accept in-kind donations (think food pantries or thrift stores, for example), as you may acquire stock at unpredictable times.

As you continue running your nonprofit’s store, feel free to rearrange your storage until it makes the most sense for your unique needs. For example, if you have any particularly popular products or items, it might make sense to move them into a storage compartment nearer to the front of your back room. By doing so, you’ll make it easier for you and other employees to restock this particular item.

2. Monitor inventory regularly.

To ensure your store is never significantly under- or over-stocked, stay apprised of your needs by regularly monitoring your business’s inventory. We recommend implementing a dedicated inventory management method to help you stay on top of your stock levels, such as one of the following:

  • First-in first-out (FIFO). This is a common inventory management method wherein stores sell items in the order they are acquired. It’s most beneficial for stores that sell perishable goods, such as flower shops or bakeries, but it can be useful for other stores as well.
  • Just-in-time (JIT). With the JIT technique, your nonprofit will only order enough stock to meet current customer demand. This is a great technique if your store has limited storage space and can’t afford to hold excess items for long periods. However, it requires you to have a good understanding of customer needs at all times.
  • Economic order quantity (EOQ). EOQ refers to a formula companies use to calculate the ideal quantity of items they should purchase to meet customer demand while minimizing inventory costs. However, it assumes that demand and holding costs remain constant, making it an inventory management technique best suited for stores that expect steady and consistent customer behavior.
  • ABC analysis. In ABC inventory management, you’ll determine the value of your inventory based on the items’ importance, ranking items based on demand, costs, and risks. “A” items are high-value, high demand, and high cost, whereas “C” items are low-value, low demand, and low cost, with “B” items falling in the middle. Based on this system, you’ll know which items to prioritize purchasing and restocking.

Ideally, you want your store to implement the perpetual inventory tracking technique on top of the aforementioned methods. This requires inventory management software (more on this later) that provides real-time information on your inventory levels, so you always have accurate data to back up your decision to order new products.

3. Analyze inventory trends.

As some of the techniques in the previous section alluded to, another crucial aspect of inventory management is analyzing trends in your products and sales. Track key metrics such as days sales in inventory (DSI), gross margin, and inventory turnover to obtain an informed perspective of your inventory.

In particular, you want to determine your:

  • Most popular items. Stay informed about your popular items to ensure your store always stays stocked to meet demand. You may also conduct surveys and research into why these items are so attractive to help you offer similar items that will also sell well.
  • Least popular items. Similarly, knowing which items don’t sell well will help you keep your inventory moving. You can stock a smaller number of these items or even choose to discontinue them if your audience shows especially low interest.
  • High sales periods. This could refer to a time of day, day of the week, or a specific period in the month or year where sales are the highest. Knowing these periods allows you to strategically time your marketing efforts, ensuring that you offer discounts and promotions when customers are likely to buy.

After your nonprofit becomes more comfortable with analyzing this information, you may consider tracking other inventory trends for further insights. For example, you can calculate your inventory turnover ratio, track overstock incidents, assess supplier performance, and consider inventory aging and obsolescence.

4. Purchase inventory management software.

Usually, inventory management comes packaged as one of many features within larger point of sale (POS) systems. According to ThriftCart, POS systems usually have these core inventory management capabilities:

  • Real-time inventory tracking. With barcode scanning and an inventory database, nonprofits that use POS systems can track their stock levels in real time so that they always know when they’re running low on merchandise.
  • Inventory syncing for physical and online stores. A common challenge for organizations that run both brick-and-mortar and online stores is ensuring that they don’t accidentally sell products they don’t have. A robust POS system will include inventory syncing features, ensuring that you only sell items you have in stock.
  • Discounting and promotions. If you need to move products that haven’t sold, discounting and promotions are the way to do it. With this feature, you can easily mark down items that you want to sell while providing customers with an excellent buying experience.
  • Receipts. While not directly related to inventory management, receipts are important for your customers’ records. Plus, if a customer makes a donation on top of their purchase at your nonprofit’s store, eCardWidget recommends sending them a tax-compliant donation receipt within 48 hours. A POS system not only makes receipting possible but also extremely convenient.

Once you purchase software, be sure to train your staff on how to use it. Schedule an onboarding session with the software provider, asking questions about areas you need clarification. Then, put together a guidebook to ensure everyone knows how to operate the system and use it for accurate inventory management. You can also use it as a helpful resource for future team members during their onboarding.


Nonprofit fundraising takes many forms, and stores are a great way for nonprofits to generate a sustainable stream of income. With proper inventory management, you’ll ensure your store runs smoothly, raising an increased amount of funds to further your mission and aid your beneficiaries.

Feature image for our post on the role of a nonprofit CRM in personalized fundraising

The Role of a Nonprofit CRM in Personalized Fundraising

What would you say if someone were to ask you, “What goes into a successful fundraising campaign?”

Drawing on your experience as a nonprofit leader, you might talk about having clear goals, coming up with unique campaign ideas, or using storytelling best practices in your marketing materials.

While it’s true that all of these strategies are important, the groundwork for fundraising success is laid long before you ever start designing a campaign. True fundraising success stems from knowing and understanding your donors, which allows you to personalize the fundraising experience.

That’s where a robust constituent relationship management (CRM) system comes into play. In this mini guide, we’ll dig deeper into the role your CRM can play in personalized fundraising. Let’s begin.

Understanding Nonprofit CRMs

Also known as a donor database, a CRM is a software tool that helps your organization manage its relationships and interactions with its supporters, including donors, volunteers, members, and others.

Though every system has different features, typically a CRM allows you to:

  • Store and manage donor data like giving history, personal details, and contact information
  • Process donations
  • Track grants and grant applications
  • Automate and manage communications with supporters
  • Generate reports that allow you to visualize your organization’s performance
  • Manage and coordinate volunteer activities

Many CRMs can also integrate with other software tools, like your social media profiles, email marketing software, product fundraising platforms, and financial tools, allowing you to manage several aspects of your operations simultaneously.

There are several popular CRM platforms, but Blackbaud and Salesforce are particularly popular providers. Here’s a little bit about each:

  • Salesforce primarily offers CRM tools to for-profit organizations but also provides robust tools to the mission-driven space. Its primary solutions are:
    • Salesforce Nonprofit Success Pack (NPSP), a series of packages that can be installed on the main Salesforce platform to make the tool useful for nonprofits
    • Nonprofit Cloud, Salesforce’s newest cloud-based solution for nonprofits that allows users to connect with other Salesforce Industry Clouds

Both tools are highly customizable solutions for mid-sized, large, and enterprise-sized organizations, but they take a little more know-how to get up and running with them.

Whether you choose to go with RE NXT or Nonprofit Cloud, or even turn to another software provider, depends on your needs. Take into consideration the features your organization wants and your budget as you start the shopping process.

Now that you know the basics of nonprofit CRMs, let’s explore two ways your CRM can help you create a more personal experience for the supporters you’re targeting with your fundraising campaign.

1. Managing Donor Data

Your CRM allows you to capture, store, and manage your donor data in dedicated donor profiles. Your team can then review the data and note specific trends and patterns, which can inform your fundraisers.

For instance, you might notice that your mid-level donors often increase their contributions after attending a fundraising event. You could then plan more events into your fundraising strategy and tailor them to your mid-level donors’ interests and preferences.

To ensure the data in your CRM is primed to provide useful insights like these, practice good nonprofit data hygiene. Here are a few tips for doing so:

  • Remove unnecessary information, like contact information for deceased individuals, incarcerated individuals (who cannot respond to marketing materials), minors, and individuals on do-not-call or do-not-mail lists.
  • Get rid of duplicate entries in your database.
  • Standardize how data is input into your CRM, like the formatting that addresses and dates should follow.
  • Verify phone numbers and email addresses.
  • Invest in data append services to supplement your own data-gathering efforts.

Prioritizing data hygiene is key to getting the most out of your data and the many fundraising features your CRM has to offer. As you set your standards for how data is collected, formatted, and updated, ensure you train your team so that everyone is on the same page and can help you maintain high-quality data.

2. Tailoring Donor Outreach

After you’ve studied your data to get a better understanding of your donors and their needs, preferences, and interests, you can put that information into action for your fundraising outreach efforts.

One of the best ways to do this is to practice thorough segmentation. Segmentation is the process of sorting your donors into groups based on their shared characteristics. Here are some common characteristics you can sort your donors by:

  • Age Group
  • Geographic Location
  • Giving Level
  • Donation Frequency
  • Engagement Level

Say you decide to sort your donors by geographic location. You would then use different outreach strategies for the different groups you create.

For example, you could invite donors who live in the city or state where your organization is headquartered to attend an in-person event or adjust your fundraising marketing materials to talk about how their donations will affect beneficiaries in their local area.

For donors who live out of state or even in other countries, you could promote virtual engagement opportunities and communicate the broader, long-lasting impact of their support for your global initiatives.

This way, you ensure your outreach resonates appropriately with the different groups and their needs instead of settling for a one-size-fits-all approach.

Personalize your outreach efforts further by using details from your CRM to make each message feel more catered to the individual. Even simply using a donor’s first name in a donation appeal instead of the generic “Dear Donor” can go a long way to grab their attention and enhance their opinion of your organization and its campaigns.


Having a robust CRM on your side can benefit several aspects of your nonprofit’s operations, but it can be especially useful for personalizing your fundraising efforts. Use the CRM shopping guidance and the personalization tips above to take your next campaign to new heights.

Should you need to upgrade your CRM or expand its functionality through custom integrations, don’t hesitate to reach out to a nonprofit technology consultant. These experts can help you implement the right solution for your organization’s needs.

How to procure charity auction items

From Wishlist to Winning Bids: How to Procure Auction Items

Imagine this—you’ve just kicked off your nonprofit’s exciting auction event. Bidding starts and the event rolls along. You’re busy mingling with guests, discussing your mission, and handling logistics. After the auction ends, you take a look at your fundraising results.

The numbers are disappointing, and something clearly went wrong with the event. Why?

There are all kinds of reasons why this might happen, and many of the most common have to do with the auction items up for grabs. Maybe there weren’t enough items, or the items that were available weren’t appealing enough to everyone to spur competitive bids. Maybe some lower-price items were highly appealing to large groups of donors, but your big-ticket items got little attention, causing your revenue strategy to fall apart.

Now imagine an auction that strikes the perfect balance between types, numbers, and values of items for its unique audience—this one will naturally do a better job at reaching its revenue goal.

Your auction item ideas and final catalog inherently play critical roles in your event’s success. Let’s walk through the essential steps and tips you’ll need to succeed with procurement.

Step 1: Lay out a procurement plan and timeline.

Start by laying out some guidelines for your procurement process. Collaborate with your event planning team to answer these questions:

  • When will the auction happen?
  • What is the auction’s revenue goal?
  • Does the auction have other goals related to the number or average value of bids?
  • Are we hosting a live auction, silent auction, or both?
  • What format will the auction be: in-person, virtual, or hybrid?
  • Do we have a specific target audience in mind, or is this event targeting a broad audience of our organization’s supporters?

Lay out a rough timeline for procurement, including specific deadlines for completing procurement, finalizing the catalog, and beginning to promote the items to attendees before event day. The time you’ll need might vary based on the scale of your event, but, generally speaking, you need a lot of time for effective procurement. Try to get started on this process as early as possible.

Next, recruit a procurement team. A mix of event staff, volunteers, and a board member or two will be helpful. Each individual will need to be comfortable reaching out to potential item donors, sponsors, and consignment companies, with one team member overseeing the effort to keep it on track and lead the catalog creation and pricing processes.

Step 2: Review your donor data.

Before you start brainstorming actual items to procure, it’s important to review your data. Insights about your target audience will be invaluable for guiding what can otherwise become an overwhelming or too open-ended process.

Review your nonprofit’s CRM or donor database to look more closely at your event’s target audience as a group. Note any trends or highlights related to information like:

  • Past event attendance—specifically auction events if possible
  • Average giving levels and/or lifetime value
  • Duration of relationship with your organization
  • Marital and parental status
  • Location, if hosting an in-person auction

If you’ve hosted auctions in the past, be sure to review event-specific data like:

  • Past auction performance and revenue KPIs
  • Items which received the most/least bids
  • Items which generated the most/least revenue compared to their market values
  • The donors or sponsors that provided items
  • The target audiences of past auctions

Look for connections between these points of data. Think through what they might mean for your current auction—what types of items have either a proven track record with your audience or would likely appeal to them based on their interests and budgets?

Step 3: Create an item wishlist.

Now comes the fun part! Sit down with your procurement team, review your data findings, and start brainstorming items and experiences that you think would make for a winning auction.

Don’t limit yourself too much here, but do try to identify items that span a range of price points. Most silent auctions lead with one or two big-ticket, ultra-desirable items or packages, then a spread of mid-level items, and a smaller set of more accessible items and packages to ensure that all bidders can feel involved. Live auctions typically feature 12-15 higher-quality items to drive maximum engagement from a target audience.

The goal is to create a robust list of “nice-to-have” items that you think would fit well with your audience and goals. You can put a few “must-haves” on your list, but keep in mind that during the actual procurement process, you most likely won’t be able to secure everything.

Once procurement is underway, you’ll get a better sense of how your catalog is shaping up and can direct more intense focus to specific items or price ranges as needed.

Step 4: Create an auction item procurement packet.

To prepare for the procurement process, create helpful resources for your team. Winspire’s auction item procurement guide recommends creating “item procurement packets” of go-to- resources that your team will need out in the field. These resources include:

  • Item procurement letters that clearly detail information about your nonprofit, its mission, the auction, the in-kind donation process, and tax deduction instructions.
  • In-kind donation forms to standardize the collection of donor/sponsor names, addresses, contact information, items, estimated values, descriptions, and other details. Copies of these forms can easily double as receipts or gift substantiations if needed.
  • A copy of your wishlist for team members to easily discuss other potential donations should a prospect say no to the first ask or express interest in helping further.

These resources should cover your bases for procurement team members to hit the ground running but don’t forget backend logistics, too. Create a central spreadsheet to input prospect information, associated items, and data collected from the donation forms as in-kind gifts are secured. This sheet should be accessible to everyone to avoid inadvertently double-asking a prospect or forgetting to procure “must-have” items.

Step 5: Review your donor, sponsor, and community contacts.

Take a look back at your list of previous auction item donors. Screen your nonprofit’s list of contacts—including individuals, large companies, local companies, and other nonprofits.

Review this list of prospects against your item wishlist and make some connections. Try answering these questions:

  • Which donors or organizations would likely want or be able to donate which items?
  • Do we have any close but informal relationships with companies that we could tap into? For instance, do we receive many matching gifts from a local company that hasn’t yet sponsored an event?
  • For items that we can’t easily procure all in one go (like themed baskets), would any prospects be willing to donate money for us to purchase those bundled items instead?
  • Do other nonprofits in the community (like zoos, theaters, or museums) have unique experiences or packages to offer?
  • If there are big-ticket item ideas or experiences on our wishlist that we aren’t likely to receive as donations, do auction item consignment companies offer them?

From here, you may wish to divide your prospect among different team members to take a more organized approach. If anyone has an existing personal or business connection with a prospect, make sure that they own the procurement process for that prospect.

Step 6: Stay organized as you solicit items.

Start working down your list of auction items and prospects. With their item procurement packets in hand, your team should be well-equipped, but make sure to provide some guidance for non-fundraisers and volunteers if needed.

Stay organized by asking all team members to immediately report the results of their conversations with prospects and the information from their in-kind donation forms. Your central procurement spreadsheet should be the source of truth for the process, and this info will be essential for:

  • Completing your procurement process and well-rounded catalog
  • Donation collection logistics
  • Item pricing
  • Donor stewardship and gift substantiation

Remember, when it comes to item procurement, time is your friend. Try to begin the outreach process as early as possible before your auction so that you have plenty of breathing room to contact prospects multiple times, find new prospects, or come up with alternate item ideas if needed.

Step 7: Begin the item pricing process.

As the auction items begin arriving, dedicate a member of your procurement team to get a headstart on the pricing process.

Striking the right mix of starting bids is a delicate process but extremely important for the ultimate engagement and revenue that your auction will generate.

Item pricing is complex and warrants its own in-depth explanation. To recap the fundamentals you’ll need to understand, take a look at this graphic:

A diagram that explains auction item pricing best practices, detailed in the text below

For each item, start by determining its fair market value (FMV), or what a person would reasonably expect to pay for it on the open market. For bundled items and experiences, roughly estimate and add up the FMVs of the component parts. For consignment travel packages, the vendor will likely provide pricing guidance, but most of the time, any amount you raise over the item’s list price goes back to your nonprofit.

Next, determine which items will have buy-now options. For many auctions, this option is ideal for your most valuable items to maximize earnings, but be careful not to discourage engagement by using it on too many items. It’s recommended to set these options at 150-200% of the item’s FMV so that the barrier is high enough to be profitable for your organization but not so high as to completely discourage bidding.

All items should receive a starting bid amount, which should be 30-50% of their FMVs. You can play around with this range based on each item’s rarity and desirability, aiming higher for high-competition items and a bit lower for common or lower-price items. For consignment packages, set this starting bid at 100-120% of its list price to ensure your nonprofit will generate revenue.

From here, set a minimum bid increase for each item. This should be high enough to ensure new bids are substantial, but not so high that it deflates the total number of bids the item receives. This requires careful strategy—another reason why it’s a good idea to get started on procurement early! A reliable rule of thumb is to set the minimum increase at roughly 10% of each item’s FMV.


Item procurement is certainly a high-stakes process, but it’s completely learnable. Its best practices are likely already familiar to you as an event planner or fundraiser, so lean into that experience to ensure your approach is organized and strategic. In no time, you’ll be promoting your items and preparing for your most successful auction yet. Best of luck!

The title of the article next to an illustration of two hands holding coins representing cryptocurrency

How to Empower Your Donors to Give Stocks & Cryptocurrency

The fundraising landscape is constantly changing and evolving, responding to new technologies, giving trends, and global developments. For your nonprofit to keep up and tap into the future of fundraising, you need to stay open to new opportunities. 

While much of the world’s attention is on artificial intelligence (AI), we’d like to bring your attention to another growing trend: the fundraising potential of appreciated assets

More and more donors want to give non-cash appreciated assets like stocks and cryptocurrency, and your nonprofit can boost its fundraising revenue by empowering them to do so. Let’s explore four steps you can take to start taking advantage of this impactful giving method.

Make it easy for them to give non-cash donations.

Donating stocks and cryptocurrency isn’t as straightforward as giving with cash or a debit card, but it doesn’t have to be difficult! You can simplify the non-cash giving process by using a tool that allows you to accept these gifts right from your online donation page, with no transaction fees required.

With an intuitive crypto or stock donation platform, donors can give non-cash gifts in just a few steps:

  1. On your donation page, the donor scans your crypto wallet QR code or clicks a button to donate stocks.
  2. The donor sends cryptocurrency to your account or inputs their stock and brokerage firm information to initiate a stock transfer.
  3. Once the transfer is complete, the platform automatically converts the non-cash gift into cash and deposits it in your nonprofit’s bank account.

Emphasize how easy this process is on both your donation page and your nonprofit’s Ways to Give page to encourage donors to consider non-cash giving. Also, add information about how much additional impact donors can make with these types of donations. For instance, take a look at how the Hoffman Institute discusses stocks and cryptocurrency on its Ways to Give page:

Screenshot of The Hoffman Institute’s Ways to Give page, which discusses cryptocurrency donations

Once you have the process set up and multiple pages on your website that promote non-cash giving, you can incorporate stock and crypto giving into all of your fundraising campaigns and easily accept non-cash gifts at any time.

Understand the benefits and potential concerns.

Next, make sure your team has a thorough understanding of both the benefits of non-cash giving and any concerns your donors may have. You’ll be able to promote these giving methods much more successfully if you can put yourself in the donor’s shoes and speak directly to their motivations, preferences, and fears.

Beyond the benefits to your nonprofit (such as earning larger donations and more sustainable funding), crypto and stock donations offer plenty of exciting benefits for your donors. These include:

  • Tax benefits: Infinite Giving’s crypto donation page explains that in addition to receiving charitable tax deductions, cryptocurrency donors don’t have to pay capital gains taxes on their gifts. While individuals normally have to pay a tax on their crypto and stocks’ appreciation, they are not required to pay it if they donate the asset.
  • Ability to give in larger amounts: If a donor’s cryptocurrency or stock appreciates in value after they buy it, they can end up donating more money to your nonprofit than they originally spent on the asset. Plus, since they bought the asset previously, the money won’t come directly out of their pocket and impact their day-to-day finances.

These are enticing benefits for donors, but be mindful that they may have concerns, too. For instance, donors might worry about their crypto gift losing value after they donate it, or they may think that the stock donation process is too lengthy to make a timely impact on your work.

If you run into these concerns, reassure donors that your organization will convert their gifts to cash immediately to preserve their value. Let them know that your non-cash giving platform streamlines the giving process for both stock and cryptocurrency donations, allowing your organization to receive donations as quickly as possible.

Launch a strategic marketing campaign.

With benefits and concerns for donors in mind, develop a multi-channel marketing campaign to promote non-cash giving. Plan to create content for all the channels your audience prefers, including email, social media, text messages, or direct mail. 

Design promotional materials that explain:

  • What cryptocurrency and stock donations are
  • The tax benefits of crypto and stock giving
  • How to donate stocks and cryptocurrency on your donation page
  • Reasons to give non-cash gifts instead of (or in addition to) traditional donations
  • How fast and secure your nonprofit’s donation process is

Vary the format of your marketing content and don’t be afraid to get creative. You might design how-to infographics, write a blog post about the impact of crypto donations, or record a video walkthrough of the non-cash giving process. 

Then, use the data in your nonprofit’s CRM to identify individual donors who may be interested in non-cash giving and send them personalized fundraising appeals. This might include mid-level and major donors, those who’ve expressed interest in non-traditional forms of giving, or supporters with high financial capacities. Consider donor demographics, too—57% of crypto owners are Millennials while only 20% are members of Gen Z.

Recognize donors who give stocks and crypto.

One of the best ways to encourage more donors to give non-cash donations is to recognize and appreciate the donors who already do. 

Public donor recognition can inspire others to learn more about non-cash giving and donate their own assets. At the same time, these efforts help you steward relationships with existing non-cash donors, boosting donor retention and encouraging them to give stocks or cryptocurrency again in the future.

Start with basic donation acknowledgment emails (which the best non-cash donation platforms can automatically send for you!), then think about additional ways to recognize those who give non-cash gifts. For instance, Kwala recommends sending gifts of branded merchandise, creating thank-you videos, or spotlighting donors in your newsletter or social media. 

When you recognize these donors publicly, whether with a social media shoutout or a page on your website, make sure to highlight their giving method and explain the gift’s impact. You might say, “Deborah donated $10,000 worth of stocks, enabling us to provide brand-new technology for our community center that serves hundreds of families in need.


Once you have experience with non-cash fundraising and accepting stock donations, consider tapping into other opportunities like investing your organization’s reserve funds to give them the potential to grow. While the process can seem daunting, a nonprofit investing advisor can help you through every step to make your organization more financially sustainable in the long term.

The title of the article, which is “Becoming Excellent at Post-Event Follow-Up: 5 Tested Tips.”

Becoming Excellent at Post-Event Follow-Up: 5 Tested Tips

It can take six months or longer to plan a nonprofit event and market it effectively. Then, the event itself requires careful management and will inevitably face a few challenges. When it’s all said and done, an event planning team may be (understandably) ready for a break, but one final step is always needed: post-event follow-up.

Follow-up is an indispensable aspect of donor engagement for solidifying supporter relationships after they’ve attended an event. Let’s explore five tested tips for mastering follow-up and securing long-term support.

1. Segment your audience.

71% of donors feel more engaged when they receive personalized content, meaning you can use what you know about your audience to divide them into groups related to their interests and send them meaningful and unique follow-ups.

Donor segmentation is the process of dividing donors into groups based on shared characteristics, which will, in this case, depend on the type of event you host. Here are some common segments you may create relevant to event follow-up:

  • First-time attendees: A follow-up message to first-time attendees might welcome recipients to your nonprofit’s community by providing brief background information about your organization and inviting them to learn more.
  • Repeat attendees: For attendees who’ve been to your nonprofit’s events before, your follow-up communications should recognize their continued support and thank them for their commitment to your organization. 
  • High-value donors: Follow-up for high-value donors should reflect the significance of their support, highlighting the direct impact their attendance and donation made. Offer exclusive insights, such as details about upcoming projects, that aren’t widely shared with other donors.
  • Non-donors: Use your follow-up to thank non-donors for their attendance and offer various ways they can continue to support your organization. For example, perhaps they’re unable to donate monetarily but can join your volunteer team. 

To make your follow-up even more individualized, create donor recognition tiers based on levels of engagement. eCardWidget’s donor recognition guide recommends assigning different types of recognition to each tier to keep your efforts organized. For example, an attendee who donated for the first time might receive a thank you card in the mail, while one who has been deeply involved with your organization for many years may receive a thank you card and a branded t-shirt.

2. Establish a detailed follow-up schedule.

Communication frequency is essential to engagement, as your nonprofit must find the balance between keeping donors informed and avoiding donor fatigue. This balance will vary greatly depending on your event attendees. For example, we know that Millenials prefer more frequent communication than other generations, and fundraising statistics show that email is the most preferred channel by 48% of donors. 

Create a post-event follow-up schedule that details when a message should be sent and the content it should include. It might look something like this:

  • Immediate acknowledgment, 0-24 hours post-event: Prompt post-event recognition is essential for maintaining the momentum generated at your event. 
  • Feedback request, 1-3 days post-event: Give donors a chance to catch their breath after the event, but ask for their feedback while it’s fresh on their minds. Send out concise surveys that don’t require much of the attendee but are comprehensive enough to gather useful data, such as multiple choice surveys with only one or two short answer questions.
  • Impact sharing, 1-2 weeks post-event: Share the outcomes of the event, including real numbers, like the amount raised, and how those donations were used. 

Additionally, consider donor preferences such as preferred communication channels. For example, you might send a donor thank-you email immediately after the event and share the event’s impact in social media posts so that it reaches a wider audience.

3. Provide valuable content.

Vague, dull, and irrelevant content can cause nearly 75% of donors to stop giving to an organization. To keep event attendees engaged after your event ends, your follow-up must provide valuable content. 

Meaningful, authentic messages go a long way in thanking donors. Infuse your follow-up with valuable content, including:

  • A thorough event recap
  • Educational content about the cause
  • Numbers and statistics, including total revenue
  • Behind-the-scenes insights into your nonprofit’s work
  • Multimedia elements, like photos and video
  • Testimonials from beneficiaries
  • Upcoming opportunities and projects

To gather numbers-related data to share with attendees, use an event management tool with analytics and reporting features. These platforms can generate reports based on your event’s performance, making it easy for your nonprofit to share data-based insights with attendees.

4. Keep the conversation going.

Effective post-event follow-up results in committed and loyal donors who attend future events and support your organization long-term. This means sending follow-up messages that encourage donors to stay engaged and even join the conversation!

Invite attendees to share their experiences or respond to your nonprofit’s communications. This might include sharing their pictures and videos from the event on social media or commenting on your nonprofit’s posts. Social media is the top marketing tool for facilitating two-way communication since it inspires nearly one-third of donors to give and is widely regarded as highly interactive because of its commenting and sharing capabilities.

5. Plan ahead using data-backed insights.

In addition to thinking ahead about keeping donors engaged, your nonprofit must also use the follow-up period to prepare for its future campaigns. Gather data about donors’ readiness to support future initiatives, such as a capital campaign

This feedback can come not only from the post-event survey you send but from a variety of sources. NPOInfo recommends leveraging post-event data metrics, such as attendance records and lead generation. You can also gain insights by:

  • Monitoring social media activity
  • Hosting focus groups
  • Analyzing website traffic and interactions
  • Conducting follow-up interviews 

Gathering feedback and doing your research shows event attendees that your nonprofit values their opinions. When you implement their ideas and address their concerns, they won’t just attend future events—they’ll become committed supporters. 


Your nonprofit knows that donor recognition and appreciation are crucial aspects of follow-up for any event or campaign. Using the tips in this guide, you can take post-event follow-up a step further to convert event attendees into loyal supporters of your cause.

The title of the text next to an illustration of people putting money in a jar, representing sustainable fundraising.

Sustainable Fundraising: Strategies for Long-Term Viability

Your mission statement is the ultimate declaration of what your organization stands for and hopes to accomplish in the long run. For instance, the American Heart Association’s mission is to “be a relentless force for a world of longer, healthier lives. As we move into the second century of our work, we are advancing health and hope for everyone, everywhere.”

This statement demonstrates that this organization is not just trying to help people fight heart disease and stroke in the present moment but is instead committed to helping people stay in better health for the long term.

When your goals are focused on the future, you need sustainable fundraising strategies that help you consistently progress toward these objectives. We’ll provide fundraising tips for how your nonprofit can achieve long-term viability.

1. Create a fundraising plan.

Before you start a fundraiser, you need a clear plan to guide you. This plan should align your entire fundraising team so everyone’s aware of your top priorities and their individual responsibilities for achieving your goals. By making your campaigns more manageable and providing a framework for future fundraising initiatives, your fundraising plan will help you achieve long-term viability.

Follow these steps to create a fundraising plan that will set you up for continued success:

  1. Identify SMART goals. Provide focus to your campaigns with both short-term and long-term objectives that follow the SMART goal framework, which stands for specific, measurable, achievable, relevant, and time-bound. For example, a cheerleading team may aim to raise $1500 with its three-month peer-to-peer fundraising campaign to supplement national competition fees based on its earnings of $1200 the previous year.
  2. Establish a timeline. Break down each stage of your campaign into manageable tasks with deadlines. At a minimum, include steps for planning your fundraiser, soliciting donations, and following up with donors.
  3. Develop a budget. Identify how much you expect to raise and spend on your campaign based on past fundraising data. These figures will allow you to determine your expected net revenue and better project your fundraising results.
  4. Delegate tasks. Distribute tasks needed to make your fundraiser a success to different members of your fundraising team. Responsibilities may include preparing fundraising and marketing materials, securing a venue for your fundraising event, or securing sponsors.

To ensure your plan includes all necessary information, use a dedicated fundraising plan template to keep everything organized. Once you find a template that works for your team, you can reuse it for all future fundraising initiatives to build consistency.

2. Diversify your revenue streams.

When you have multiple revenue streams, you can be more confident in your organization’s ability to reach its fundraising goals and provide for its beneficiaries, even if one funding source dries up. Examples of potential revenue streams include:

  • Individual donations, whether those come from peer-to-peer fundraising, online campaigns, product fundraisers, or regular submissions on your donation page
  • Grants from foundations, businesses, or government agencies to fund specific projects or programs
  • Corporate partnerships that result in corporate giving revenue and sponsorship opportunities
  • Events, such as walkathons, galas, and auctions
  • Earned income from merchandise sales, program fees, and membership fees

Maximize these revenue opportunities by combining them as your organization sees fit. For example, you may host your annual spring festival fundraiser where you also sell flower bulbs to earn extra funds.

3. Focus on donor retention.

According to Double the Donation’s donor retention guide, the average donor retention rate for nonprofits is 45%, meaning that the majority of donors don’t make repeat donations. The cost of acquiring donors who only give once makes it significantly more cost-effective to keep current donors around instead.

Plus, the more donors you retain, the better you’ll facilitate a community around your cause instead of a group of disparate one-time givers. Some ways you might increase donor retention include:

  • Providing multiple ways to give. Encourage donors to continue contributing to your cause by giving them a choice in the way they give. Select a payment processor that accepts a variety of payment methods, such as credit, debit, ACH check, PayPal, Apple Pay, and Venmo.
  • Offering recurring gifts. One of the easiest ways to secure steady revenue is to automate the giving process for repeat donors. When you offer recurring giving, you make it simple for those who are passionate about your cause to contribute on a monthly basis after filling out your donation form just once.
  • Showing appreciation. Thanking donors for their support goes a long way in showing them that they’re valued and entices them to continue giving back. Test a variety of donor recognition strategies, including eCards, thank-you notes, social media shoutouts, and appreciation events.

Get a sense of how successful your donor retention efforts are by asking supporters directly. Consider surveying them once a quarter to see whether they feel inclined to keep contributing to your organization, and question if there is anything else your nonprofit could do to provide them with a better experience.

4. Involve a variety of stakeholders.

When you engage a variety of stakeholders in the fundraising process, you take the pressure off your staff to facilitate all fundraising activities, making it easier to run campaigns efficiently. For instance, you may train board members and volunteers to lead donor cultivation and solicitation activities so you can better distribute your fundraising team’s work.

Reaching out to local businesses can also alleviate concerns about reaching your fundraising goals or hitting your targets in a timely manner. Many companies are willing to sponsor events, contribute in-kind donations, or promote your organization online. Look for businesses with similar values to your organization so the partnership is mutually beneficial. For example, an environmental conservation organization may work with an upcycled clothing brand.

Lastly, if your fundraiser involves kids, teach them how to fundraise on behalf of your organization. Not only can schools and student groups raise more for their causes with more helping hands, but they can also teach kids the importance of giving back. As ABC Fundraising’s fundraising ideas for kids guide states, 80% of parents who model philanthropic behavior see it reflected in their children. Set a good example for the kids in your organization, and reach your fundraising goals more quickly at the same time.


Continue supporting your beneficiaries and upholding your mission for the long haul with sustainable fundraising ideas and practices. That way, you can rest assured you’ll see a regular inflow of donations to your organization that enable you to carry out your important work for years to come.

The title of the article next to an illustration of a graduate with his parents

5 Ways You Can Streamline College Admissions with Texts

These days, a significant portion of college life happens on students’ phones. On average, students spend almost 95 minutes a day texting—meaning that if you want their attention, you need to meet them there. This is true for both current and prospective university students.

Fortunately, the applications and uses for higher education SMS are limitless. From recruitment all the way to graduation and beyond, text messages can help you deliver a better and more engaging student experience.

In this guide, we’ll focus on where text messages fit into the admissions process. We’ll discuss how the right strategies and technology can boost efficiency and help you build relationships with prospective and admitted students. Let’s dive into five ways you can leverage SMS for admissions.

1. Connect with prospective students.

Text messages are the perfect communication channel for getting prospective students’ attention and building genuine relationships that make them interested in learning more about your school.

But why should you opt for texts instead of traditional channels like email or direct mail? Mogli’s SMS marketing guide explains that texts are the best choice because they’re easy for recipients to read and easy for your team to send with an intuitive text marketing app. Plus, SMS messages have an impressive 98% open rate, meaning recipients are much more likely to open your text messages than emails. 

To leverage this channel to connect with prospective students, you might use texts to:

  • Send a survey asking recipients how interested they are in your school and how likely they are to apply.
  • Send an automated text to everyone who attended an admissions event expressing how glad you are they attended.
  • Share links to student testimonials or blog posts on your college website that give prospects a positive impression of your school.
  • Respond to text messages from prospects to answer their questions and further engage them.

Ideally, you should build out a strategic SMS campaign cadence for prospects so you don’t overwhelm them with too many messages in a short time. For instance, you might use a content calendar to space out messages across the fall semester or use automation tools to set up certain prospect actions that trigger relevant messages.

2. Send application reminders.

Most applicants aren’t just applying to your school—they’re likely deep into their college search and may feel overwhelmed with all the applications and details they need to keep track of. Help out prospective students and encourage them to apply by sending simple text reminders about upcoming deadlines, the status of their applications, and other important announcements. 

Plus, using the best SMS marketing apps, you can easily automate messages for certain groups to streamline these reminders. For example, you might segment prospective students in your database based on their:

  • Application status: Create groups of prospects who have submitted applications, those who started them but have not finished, and those who sent in applications with missing information. You can send requests for missing application data and remind those in the “started” category to finish by the deadline.
  • Level of interest: Consider sending out a text survey that asks about prospects’ interest levels, then grouping them based on their answers. Those who are the most interested will want more frequent application reminders, while students who aren’t sure will need a more strategic approach.
  • Potential field of study: If you have multiple applications for different colleges or programs within your university, applicants will need to remember to fill them out before the deadline along with their main application. Send targeted reminders for those with an interest in specific schools so they don’t forget.

Setting up automated reminders saves your staff time, keeps prospective students in the loop, and delivers a better overall admissions experience. Even if they apply to five other colleges, these messages will give them a positive impression of your school that they’ll remember when it comes time to make their decision.

3. Respond to questions quickly.

One-to-one text messages open the door for impactful two-way communication, empowering prospects and admitted students to ask questions and bring up concerns directly to your admissions team. Instead of leaving applicants and students in the dark or losing their questions in mountains of emails, you can answer with a quick text.

When you receive a question via text, any of your team members can respond quickly to get students the information they need to navigate the admissions process with ease. With a unified SMS app that integrates with your CRM, all relevant team members can see and respond to text conversations at any time. Follow-up questions will stay organized in the same text thread so no data gets lost in the shuffle.

Get a question you can’t answer? Pass their text message along to the financial aid team or the appropriate counselor. You can even direct prospects to pages on your website with more information by sending them a link directly. 

4. Provide real-time application updates.

As every admissions counselor knows, applicants have a lot on their plates. Their future often feels unclear until they know if they’ve been admitted to their top school and made their decision, and they feel this pressure acutely. Anything you can do to ease their minds during the application process and keep them as up-to-date as possible will help.

One easy way to do so is to send real-time updates about general admission, financial aid, and scholarship applications via text. Applicants can read all the details in their emails, but they’ll greatly appreciate an immediate text alert when their application status changes. 

For example, you might send the following texts to update applicants:

  • Andrew, we just received your application for the Singh College of Business. We’ll let you know if we need any more information. Otherwise, you’re all set!
  • Hi Andrew, it looks like we’re missing your FAFSA information. Could you please edit your application in our portal here to complete it? Thank you!
  • Congratulations, Andrew! Your application for Singh College has been accepted! Please check your email for more information. We’re so excited to have you!

The easiest way to send these texts is to integrate your text automation tools with your CRM or application management software. If you go this route, Acceptd’s application management software guide suggests finding a solution with intuitive progress tracking features. This way, you can set up automated messages based on application progress and status changes.

5. Support new students in their transition into college life.

With the right SMS strategies, you can engage students with text messages throughout their entire journey with your university, from prospect to full-time student to alum

Don’t stop texting students once they’re admitted! Use SMS to help them prepare for the transition to college life during the summer and throughout their first semester. For example, you might send the following message to students admitted to your liberal arts program in July:

Langston, are you getting excited about coming to campus yet? We can’t wait! 🎉 Check out our blog post about the most important dorm supplies to pack here.

You can use messages like this to send reminders about room assignments, blog posts to ramp up excitement, and more. Put yourself in the shoes of incoming freshmen and write messages that speak to their needs, emotions, and concerns about coming to college.


All of these tips will help you connect with prospective and admitted students in the format that they’re most comfortable with—texts. Best of all, the power of texts extends beyond the admissions process. You can use SMS to improve your university’s fundraising, alumni engagement, student communications, and so much more.

The title of the text next to an illustration of a man and a woman with tools and a light bulb rocket ship between them, representing handling unexpected event challenges.

4 Tips for Handling Unexpected Challenges During Events

When planning an event for your nonprofit or association, you’re probably focused on securing a venue, soliciting sponsor support, and encouraging people to register for your event online. Likely, you’re not anticipating things that could go awry at your event. However, all event organizers know there’s a chance that something will go wrong, such as the internet going out, your check-in software malfunctioning, or attendees getting lost.

While you can’t always prevent these issues from popping up, you can prepare yourself to tackle them head-on and ensure your event remains a success. In this guide, we’ll cover tips for handling unexpected event challenges so you can remain calm, cool, and collected if and when disaster strikes.

1. Create a crisis response plan.

Before your event, create a plan for addressing specific protocols and procedures your staff should follow in the case of an unexpected challenge or emergency. While you can’t anticipate every potential issue, list risks and scenarios that could arise and how your team would handle them.

For example, let’s say you’re hosting a panel as part of your virtual event, and the featured panelist loses internet connection, causing them to miss the session. In this scenario, you’d want to have answers to the following questions ready to go:

  • Is there anyone else who can step in to fill the panelist’s place?
  • Does the panelist have any materials or resources that attendees can reference to make up for the information they missed?
  • Will you need to make changes to the event schedule to accommodate the issue?

Additionally, delegate roles for your event staff, volunteers, and other key stakeholders in a possible crisis. That way, everyone knows their responsibilities and can prepare themselves to take action instead of overwhelming the event organizers with questions and concerns.

2. Familiarize yourself with your event tech in advance.

When you’re hosting an event, many of the potential issues you’re anticipating likely have to do with the event technology you’re using. Make sure all staff and stakeholders know how to use the software they’re responsible for—whether that’s your event management platform, app, video conferencing software, text-to-give tool, or something else entirely.

To get all team members on board with your event technology, follow these steps:

  • Assess your training needs. Start by determining who needs to learn how to use which features of your software. For example, volunteers may only need to learn how to check people in with your event management software while staff members must be familiar with how to set up gamification challenges and communicate with attendees.
  • Gather or create training materials. Next, provide your team with the resources they need to familiarize themselves with the software. These may include user manuals, online tutorials, help guides, and training videos. Additionally, you may compile a list of tips you’ve come up with after testing out the software yourself.
  • Offer hands-on training sessions. Lastly, allow team members to experiment with the software in a training session. Consider demonstrating how to use the tool and walking through key features so people can immediately start testing the software and ask questions.

Additionally, EventMobi’s event management software guide recommends looking into the customer support options for your event tools. Will you be able to contact them during the event just in case of an emergency? Some providers will even send a representative of their team on-site, which can help ensure everything runs smoothly and that your team can quickly resolve any issues with the software.

3. Communicate effectively with stakeholders.

If things don’t go as planned, being open and transparent with your stakeholders is essential. Keep everyone informed about the situation—including event staff, exhibitors, sponsors, speakers, and attendees—by:

  • Notifying everyone as soon as possible. Once you’ve assessed the issue and formed a solid plan to tackle it, let your stakeholders know what’s going on. That way, you promote honesty with your stakeholders, even when everything isn’t going according to plan.
  • Providing regular updates. Keep everyone updated on the status of the issue through announcements or push notifications on your event or conference app. For instance, attendees and speakers will appreciate knowing if there are any changes to your event schedule so they can plan accordingly.
  • Explaining your efforts to resolve the issue. Assure stakeholders that you’re working hard to resolve the issue by explaining how you’re fixing things. For example, if your internet connection goes out during event check-in, explain to incoming attendees that you’re currently working with the internet company to get the connection back up and running and will check them in manually in the meantime.

While you may be nervous about disclosing any problems or shortcomings during your event, your stakeholders will prefer your honesty over attempts to cover up the issue and hide it from those involved with your event.

4. Learn from your experience.

Mistakes happen, but it’s how you handle them that matters. After your event, debrief and evaluate how your team handled any challenges. Compare your original crisis plan to what actually occurred, and make updates as needed.

Then, document any lessons learned, best practices, and key takeaways to inform your future event planning and management efforts. For instance, if your conference venue was difficult for attendees to find and didn’t have adequate on-site parking, you may note to seek out another venue for your next event.

Lastly, ask stakeholders for their input. According to 360MatchPro, 66% of people volunteer to improve their community, and 83% volunteer to contribute to a cause they care about. These statistics demonstrate that your volunteers—and other stakeholders—are invested in your success, and they may be able to offer insight into what worked well and what didn’t from a different perspective.


With a plan (and the right mindset) for mitigating challenges, your team will be better prepared to handle any unexpected issues, hopefully alleviating some stress for your organization. After the event, be sure to thank attendees for their patience and positivity despite any challenges that may have occurred, and follow up with additional event or engagement opportunities.

The title of the article, which is “Nonprofit Chart of Accounts: A Guide for Getting Started.”

Nonprofit Chart of Accounts: A Guide for Getting Started

Between the limitations of restricted funds and the need to continue fueling charitable missions, your nonprofit must keep organized data for a successful approach to accounting. A foundational tool for keeping organized finances is the nonprofit chart of accounts (COA), which is a resource that records your organization’s financial activity.

In this quick guide, we’ll explore how you can create a COA by covering the following topics:

As a nonprofit leader, you know that accurate financial records and reporting are crucial to maintaining your 501(c)(3) status. Let’s explore the basics of COAs so your organization can establish a system for reliable recordkeeping.

What is a nonprofit chart of accounts?

A nonprofit chart of accounts (COA) is a spreadsheet or table that lists an organization’s financial accounts and ledgers. This table is a directory of your nonprofit’s financial records, helping you organize important information about your finances. It is typically divided into five categories:

  • Assets, or anything that your nonprofit owns.
  • Liabilities, which include everything your nonprofit owes.
  • Net assets, or the total amount your nonprofit is worth. This is calculated by subtracting your liabilities from your assets.
  • Revenue, which consists of any funding your organization receives through its various income sources.
  • Expenses, or all the expenditures your nonprofit incurs for its operations and fundraisers.

While it offers a broad overview of your finances rather than a deep dive into insightful metrics, your COA is the foundation upon which you’ll build reports that summarize your financial data, such as your:

  • Statement of activities: Outlines your organization’s revenue, expenses, and net assets
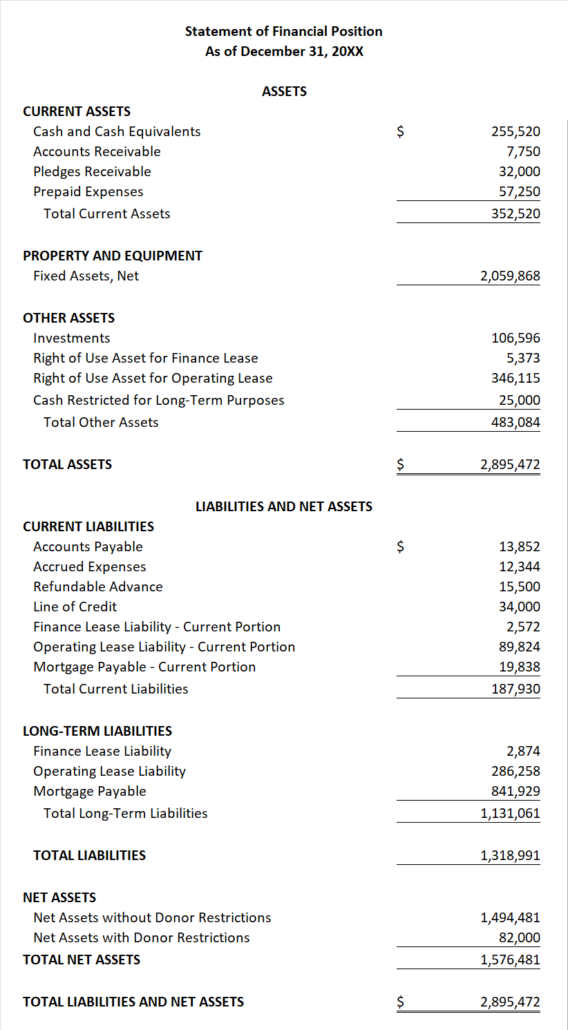
  • Statement of financial position: Indicates your nonprofit’s financial health by breaking down your assets, liabilities, and net assets
  • Statement of functional expenses: Shows how your funding is used to fulfill your mission by dividing your expenditures into the categories of program, administrative, and fundraising costs
  • Statement of cash flows: Reveals how cash moves in and out of your organization

According to Double the Donation, these financial statements are helpful when filing Form 990, which has a direct impact on your nonprofit’s ability to maintain tax exemption! In other words, your COA is an important tool for finding the information you need to file, as well as navigating financial records in case of an audit.

How to create a nonprofit chart of accounts

Every nonprofit’s finances are unique, and your chart of accounts will be, too. Although your chart must be organized in a way that makes sense for your organization, you can use the following steps to guide its development.

1. Determine your numbering convention.

A chart of accounts uses a numbering convention to identify certain categories of financial data. While your organization can use whatever system works best for your data, the numbers are usually organized as follows:

  • 1000: Assets
  • 2000: Liabilities
  • 3000: Net assets
  • 4000: Revenue
  • 5000: Expenses

You’ll use this numbering system to categorize your financial data and then create subcategories to make your records as detailed as possible. For example, your subcategories might look something like this:

  • 1100: Property
  • 2100: Employee salaries
  • 3100: Restricted net assets
  • 4100: Event ticket revenue
  • 5100: Fundraising expenses

Depending on the complexity of your budget, you may need to get more specific with each category. For example, money spent on donor recognition efforts may be lumped in with fundraising expenses or given its own category. Ultimately, it depends on how much your nonprofit gains and spends in a given category.

2. Fill in the account information.

Once you’ve determined how you’ll categorize financial data, it’s time to set up the document! List your financial activity according to your category numbers and their names. Place the account number in one column and its name in the next.

For example, your list of assets might look something like this:

  • 1100: Checking
  • 1200: Savings
  • 1300: Investments

In the next column, you’ll list the main category for these records, which would be “Assets” in our example.

3. Add notes as necessary.

For extra transparency in your financial records, be sure to include a column for notes. This way, you’ll be able to look back on your spreadsheet and remember exactly what each account refers to.

For example, if your nonprofit relies on fundraising event revenue, it might be helpful to categorize fundraisers by event type and include a note for more details. This way, you’d be able to see that record 4200 refers to the revenue collected from product fundraisers specifically, rather than a lump amount of all fundraising revenue.

Best practices for maintaining your chart

After your nonprofit creates its chart of accounts, you need to maintain it over time to ensure it accurately reflects your changing financial activities and circumstances. To ensure you properly maintain this resource, employ the following best practices:

  • Work with a nonprofit bookkeeper. Partner with an expert who can review your chart of accounts. Foundation Group’s bookkeeping guide recommends hiring a professional who has experience with nonprofit finances and a deep understanding of state and federal rules. This way, you’ll entrust this full-time job to an expert who can handle it.
  • Keep your accounts simple. While your COA should offer ample detail to be easily navigable, it must also avoid becoming overwhelming. Group accounts where possible but divide them into more specific subcategories when necessary.
  • Remove unused accounts from your chart. To ensure your chart is relevant and up-to-date, remove any unused or unnecessary accounts. For example, there’s no need to log a category for federal grants if your nonprofit doesn’t plan to apply for any.

Above all, remember to include room for growth in your COA. Your nonprofit’s finances will change over time, and the best way to account for that is to make the chart easily editable. Additionally, familiarize yourself with each account to avoid creating unnecessary ones when it’s time to log a new activity.


Many nonprofits start as a charitable mission with a few initiatives, then expand over time into an organized operation with a clear mission and fundraising approach. Naturally, your nonprofit’s finances can become increasingly complex as a result. With a COA, you’ll be able to stay organized with your accounting, ensuring you comply with nonprofit requirements.

The article's title, "A Step-by-Step Guide to Choosing Event Management Software," beside an illustration of a woman using a laptop at a desk.

A Step-by-Step Guide to Choosing Event Management Software

For event planners at an association, nonprofit, or other organization, investing in the right event management software can streamline many of your tasks, making your job easier.

From large trade shows to fundraising events, having an event platform that facilitates planning, alleviates common bottlenecks, and enhances the attendee experience can ensure success every time. It also ensures your organization has ongoing access to data that you can use to guide your future decision-making.

However, there are a lot of options on the market and not all of them provide the same level of support or effectiveness. Here’s how to make the best decision before you invest. 

What is Event Management Software?

Event management software is a tool that supports the entire planning process for your event. This typically includes online registration, attendee badging and check-in, and gathering reporting data. 

Well-selected event management software is capable of:

  • Ensuring team productivity and successful working relationships
  • Enhancing attendee satisfaction
  • Improving return on investment (ROI)
  • Gathering strategic insights for decision-making
  • Reducing event planning costs and time drains

The best event management software helps you plan and execute events from start to finish. 

Types of Event Management Software

Every organization’s event needs are different, which is why there are so many different platforms to choose from. There are primarily two types of event management software:

Specialized Single-Purpose Tools

Some software products are single-purpose tools, meaning they are very good at doing one thing or one event. These tools can typically handle tasks like:

  • Registration and ticketing
  • Event marketing and promotion
  • Mobile app design and management
  • Floor planning
  • Badging
  • Sponsor management

If one single, specialized platform meets your specific end goal, it may be more cost-effective to consider this option.

All-in-One Event Management Software

All-in-one event software aims to address all of your event needs in a single platform. This typically includes all event planning tasks, including those listed above.

While these platforms have a higher cost, they can streamline event planning by keeping the entire project within a single application. This often includes everything from registration, event marketing, and event reporting. Their more robust features make them ideal when you’re not just planning a single event but likely will host multiple over time. 

What are the Common Features of Event Management Software?

Depending on your event needs, your software should include the tools and features necessary to plan an effective event and manage it from start to finish. There are numerous areas to consider, such as:

Sponsor Management

Managing sponsors is critical for all event planning teams. Event sponsorship management features can include:

  • Sponsorship categories to organize sponsors based on commitment or sponsorship levels
  • Digital asset management for sponsor logos and graphics
  • Sponsor portals that provide sponsors with relevant information
  • Custom sponsor branding options
  • Sponsor advertising options through an event app

These features streamline the sponsorship process, enhance sponsor engagement, and maximize the value for both event organizers and sponsors.

Registration Technology

Most event management solutions support establishing and managing your event registration process. Though tools are different, expect to find features like:

  • Badge creation and printing
  • Various types of registration, timelines, restrictions, and other customization options
  • Automated registration emails to provide reminders and detailed information for attendees
  • Group registration options
  • Secure payment gateways

These features are designed to make the registration process as smooth and efficient as possible, improving the experience for attendees and providing event organizers with essential data and insights for future event planning and marketing.

Event Marketing

Many platforms offer marketing tools that will assist in growing your total registration and attendance. Some of the most common features of event marketing are:

  • Email tools for sending various messages like event invitations, registration confirmations, and newsletters
  • Customizable event website, including registration forms, speaker profiles, agendas, and payment tools
  • Social media integration, which streamlines access to various social media platforms to share updates and engage with attendees before, during, and after events
  • Marketing analytics and reporting

Having a strong marketing plan is vital to ensuring your event produces the ROI needed to make the whole event worth it.

Key Factors to Consider When Choosing Event Management Software

Before deciding on any platform, it’s crucial to know what you need the tool to do based on the way you run your event. Effective event management software must meet your specific needs, and while these may change, consider what key factors matter most or how adaptable your prospective platform is. Here are several essential factors to keep in mind: 

Event Goals and Objectives

When selecting event management software, consider how the solution aligns with your event’s objectives and the overarching goals of your organization.

The software you choose should not only resonate with these goals but should also amplify your ability to achieve them with finesse and precision. It’s about finding a tool that transforms your vision into reality, fostering an environment where every aspect of your event is seamlessly orchestrated to meet, and even exceed, your attendees’ expectations.

Attendee and Staff Experience

The software you select should specifically address the types of experiences you hope to create for both attendees and event staff. Giving your attendees an impactful experience is key to building relationships. Always look for:

  • User-friendly experience for attendees
  • Ease of use for your staff
  • Available onboarding support

Keep an eye out for solutions with an easy-to-use but intuitive interface and supportive tools. You don’t want to make more work for your team or make it complicated for attendees to get the support they need.

Event Planning Frequency

How often do you plan to host events? For occasional or one-time events, you need solutions that align just with that type. However, if you’re hosting events on a regular schedule, it’s more important to ensure the planning and execution of multiple events at one time can work well together. 

Necessary Features

While event software with a plethora of features might seem attractive, focus on those that are essential for your specific requirements. Identify the features that are critical to your event’s success. This could range from registration and ticketing systems to attendee engagement tools or analytics.

Software bloated with features you’ll never use can lead to unnecessary complexity and costs. It’s important to differentiate between ‘nice-to-have’ and ‘must-have’ features. Use cost-effective decision-making and keep your budget in mind as you conduct research into potential options.

Integrations

Many organizations use a variety of digital tools in their daily operations. The right integrations with an event management system can keep everything smooth and organized. Consider tools that align with your CRM, for example.

Steps to Choosing the Best Event Management Software

Navigating the event management software landscape can be intimidating, with an array of options each boasting unique features and capabilities. However, selecting the right software is crucial for your event’s success. Simplify your decision-making by following these steps:

1. Understand your event management needs.

Using your event goals, figure out what specific needs you want your event management software to address. For instance, consider:

  • Event types 
  • Team skills or in-house supportive tools
  • Target audience and attendees 
  • Growth rate over time
  • Analytics insights
  • Regulatory or compliance concerns

Note these down and use these as a reference as you begin exploring potential event solutions for your organization.

2. Identify your event management software non-negotiables.

Every event management solution should support the way you plan to operate your events over time. Outline factors you consider non-negotiable or the specific features and tools you want your product to offer. This may include:

  • Functional aspects like ticketing, event registration, attendee engagement, and agenda management
  • Integration requirements, including marketing and CRM tools
  • Training and support
  • Security features

For example, if you’re planning to host a hybrid or virtual event, you might want to prioritize solutions that make it easy for you to engage attendees online.

3. Research and compare software providers.

Once you have these lists, it’s time to check out the products on the market. During your research, consider the following information:

  • Market research and case use studies
  • Vendor evaluation, including references and reviews
  • Pricing comparison among products

Compare each solution based on your requirements and needs to start compiling the top options for your team to consider.

4. Request demos or sign up for free trials.

With your shortlist created, ask for demos or sign up for trial periods that allow you to test-drive prospective platforms. Take the time to read through and understand the often unseen aspects of new software like:

  • Pricing
  • Contract terms
  • Limitations and restrictions
  • Service level agreements
  • Legal and compliance requirements 

Once you’ve asked any specific questions and gotten a clearer understanding of how the platforms work, re-assemble your team and make your decision.


Choosing the right event management software tailored to your specific needs can transform how you orchestrate your events. By thoroughly evaluating and comparing available options, you can make a strategic decision that will yield long-term benefits, enhancing the way you manage and execute your events for years to come.